11. Resource type Terraform
Module type vs. Raw Resource type
AWS EKS를 생성하는 방법은 두 가지가 있다.
하나는 다음과 같은 EKS Module 방식이다.
module "eks" {}보통 적은 코드로 best-practice가 built-in 되어있기 때문에 많이 사용된다.
둘째는 raw Resource 방식이다.
resource "aws_eks_cluster" "main" {}이 방식은 Subnet, IGW(Internet Gateway), Route Table을 하나하나 다 설정해주는 방식으로 full control이 있다는 장점이 있지만 코드가 길어진다는 단점이 있다.
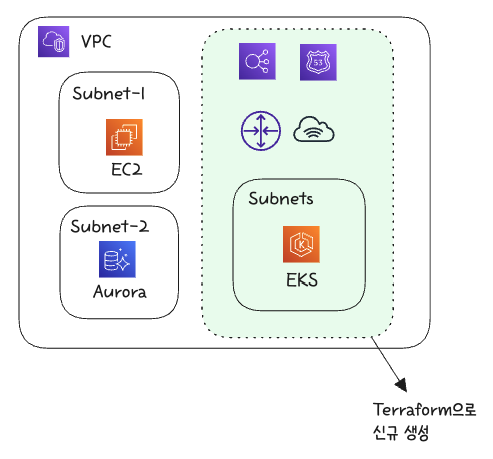
기존 VPC에 EKS 생성
물론 ‘EKS module’ 방식을 사용한다고 terraform destroy 할 때 내가 안 만들었던 것도 자동으로 지워지는 참사가 일어나지는 않는다. 하지만 정확히 어떤 리소스를 내가 새로 생성할지, 기존에 있던 리소스는 어떤 것을 같이 사용할 지 full control을 갖기 위해서는 Resource 방식을 사용하는 것도 나쁘지 않다.
밑에는 우리가 Terraform을 도입하기 이전에 이미 설치되어있는 모습인데, 이 수많은 리소스를 다 삭제하고 Terraform으로 대체시킬 수는 없는 여건이다.
그렇다고 아예 새로운 VPC를 생성한다면, 기존부터 사용하던 Aurora database에 연결을 위해서는 VPC peering을 해야하므로, 기존 VPC에 설치하려고 한다.
그리고 이렇게 하기 위해서 정확히 내가 신규로 생성하는 리소스가 무엇인지, 위에 10개의 글에서는 EKS module과 Resource 방식을 조금 혼용해서 사용했지만 전부 Resource 방식으로 변경하려고 한다.
코드
00-provider.tf
Region은 변수로, Kubernetes 설치, 그리고 CA(Cluster Autoscaler)와 Metrics Server는 기존 helm chart를 사용하는 EKS blueprint로 설치한 것을 재사용할 것이기에 helm도 설치.
provider "aws" {
  region = var.aws_region
}

# Kubernetes provider configuration
provider "kubernetes" {
  host                   = aws_eks_cluster.demo.endpoint
  cluster_ca_certificate = base64decode(aws_eks_cluster.demo.certificate_authority[0].data)

  exec {
    api_version = "client.authentication.k8s.io/v1beta1"
    command     = "aws"
    args        = ["eks", "get-token", "--cluster-name", aws_eks_cluster.demo.name]
  }
}

# Helm provider configuration
provider "helm" {
  kubernetes {
    host                   = aws_eks_cluster.demo.endpoint
    cluster_ca_certificate = base64decode(aws_eks_cluster.demo.certificate_authority[0].data)

    exec {
      api_version = "client.authentication.k8s.io/v1beta1"
      command     = "aws"
      args        = ["eks", "get-token", "--cluster-name", aws_eks_cluster.demo.name]
    }
  }
}

terraform {
  required_providers {
    aws = {
      source  = "hashicorp/aws"
      version = "~> 5.34"
    }
    kubernetes = {
      source  = "hashicorp/kubernetes"
      version = "~> 2.20"
    }
    helm = {
      source  = "hashicorp/helm"
      version = "~> 2.10"
    }
  }
}
01-vpc.tf
기존에 사용사던 VPC를 사용하기 위해 data로 정보를 가져온다.
data "aws_vpc" "main" {
  id = var.existing_vpc_id
}
02-igw.tf
Internet Gateway로 새로 하나 만들어준다. (VPC 빼고 다 그냥 새로 만들어준다.)
resource "aws_internet_gateway" "igw" {
  vpc_id = data.aws_vpc.main.id

  tags = {
    Name = "igw"
  }
}
03-subnets.tf
# Private Subnet
resource "aws_subnet" "private" {
  count             = length(var.availability_zones)
  vpc_id            = data.aws_vpc.main.id
  cidr_block        = var.private_subnet_cidrs[count.index]
  availability_zone = var.availability_zones[count.index]

  tags = {
    "Name"                                      = "private-${var.availability_zones[count.index]}"
    "kubernetes.io/role/internal-elb"           = "1"
    "kubernetes.io/cluster/${var.cluster_name}" = "owned"
  }
}

# Public Subnet
resource "aws_subnet" "public" {
  count                   = length(var.availability_zones)
  vpc_id                  = data.aws_vpc.main.id
  cidr_block              = var.public_subnet_cidrs[count.index]
  availability_zone       = var.availability_zones[count.index]
  map_public_ip_on_launch = true

  tags = {
    "Name"                                      = "public-${var.availability_zones[count.index]}"
    "kubernetes.io/role/elb"                    = "1"
    "kubernetes.io/cluster/${var.cluster_name}" = "owned"
  }
}
위 코드의 블록은 2개지만 variables.tf에
variable "availability_zones" {
  description = "List of availability zones"
  type        = list(string)
  default     = ["ap-northeast-2a", "ap-northeast-2c"]
}
2개를 설정해놨기 때문에 정작 public subnet 2개와 private subnet 2개가 생성될 것이다.
위 코드 중
"kubernetes.io/role/internal-elb"           = "1"
...
"kubernetes.io/role/elb"                    = "1"
이 태그는 나중에 NLB를 생성할 때 internet facing Load Balancer가 어떤 subnet을 바라봐야하는 지를 tag 이름을 보고 판별할 수 있게 해준다.
또 위 코드를 보면 public subnet에만 public IP를 할당하게 했다.
map_public_ip_on_launch = true04-nat.tf
일부 회사는 하나의 private subnet당 NAT 하나씩 배정하기도 하지만, 대부분 회사는 private subnet이 2개, 3개여도 NAT gateway는 하나만 구축한다. 비용때문도 있고 outbount traffic이 아주 많지 않은 이상 production에서도 하나면 된다.
resource "aws_eip" "nat" {
  domain = "vpc"

  tags = {
    Name = "nat"
  }
}

resource "aws_nat_gateway" "nat" {
  allocation_id = aws_eip.nat.id
  subnet_id     = aws_subnet.public[0].id

  tags = {
    Name = "nat"
  }

  depends_on = [aws_internet_gateway.igw]
}
윗부분 eip는 Elastic IP로 AWS에서 NAT Gateway는 고정IP를 할당해야만 생성할 수 있다. 어차피 e-commerce에서는 배송시스템에서 EKS cluster의 outbound IP 하나에 대해 방화벽을 해제하기 때문에 고정IP를 할당하는 것이 좋다.
두번째 블록의 코드는 이 NAT gateway를 public subnet의 하나에 위치시킨다는 뜻이다.
05-route.tf
위에 IGW, NAT gateway를 구축했으니 이제 Route Tables를 생성해 줄 차례다.
RT(Route Table)은 private과 public에 각각 생성해준다. 즉,
- private RT → NAT Gateway
- public RT → Internet Gateway
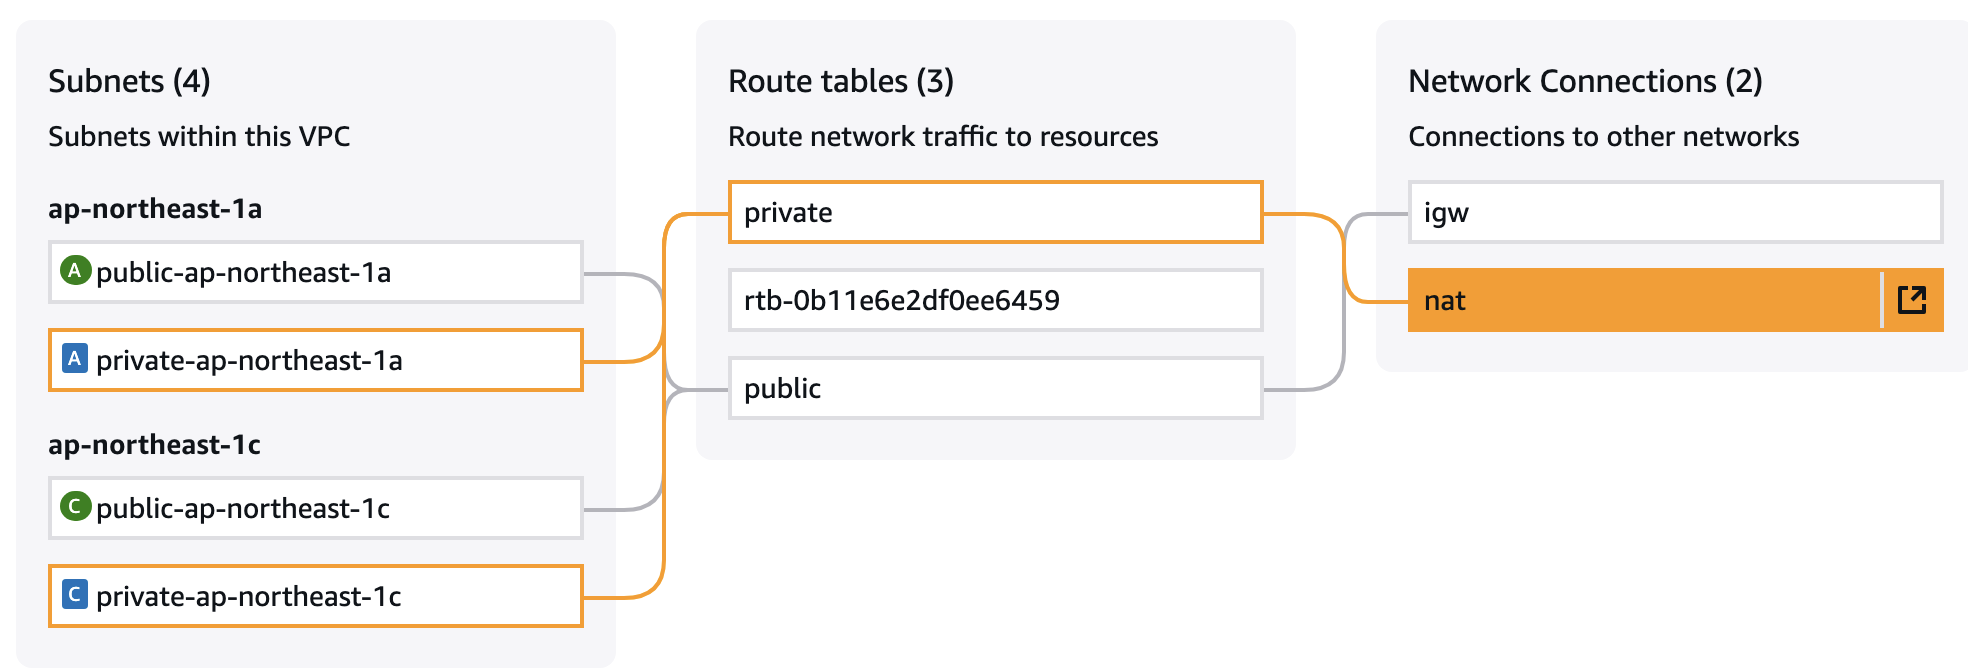
가운데 RT은 default RT이고, 위처럼 private과 public subnet끼리 하나씩 RT이 생성된다.
resource "aws_route_table" "private" {
  vpc_id = data.aws_vpc.main.id

  route {
    cidr_block     = "0.0.0.0/0"
    nat_gateway_id = aws_nat_gateway.nat.id
  }

  tags = {
    Name = "private"
  }
}

resource "aws_route_table" "public" {
  vpc_id = data.aws_vpc.main.id

  route {
    cidr_block = "0.0.0.0/0"
    gateway_id = aws_internet_gateway.igw.id
  }

  tags = {
    Name = "public"
  }
}

# Associate private RT to private subnets
resource "aws_route_table_association" "private" {
  count          = length(aws_subnet.private)
  subnet_id      = aws_subnet.private[count.index].id
  route_table_id = aws_route_table.private.id
}

# Associate public RT to public subnets
resource "aws_route_table_association" "public" {
  count          = length(aws_subnet.public)
  subnet_id      = aws_subnet.public[count.index].id
  route_table_id = aws_route_table.public.id
}
06-eks.tf
아래 코드를 보면 우선 AssumeRole 부분이 있다. → AWS 계정 안에서 운영되는 EKS control plane은 AWS에 대한 IAM roled을 부여받아야하는데 이에 assume role을 할당하는 부분이다.
그리고 EKS cluster의 IAM role을 세팅해주고, EKS cluster를 생성한다.
VPN 세팅을 안 했다면 아래와 같이 public endpoint를 할당해주고, control plane의 ENI를 유동적으로 private과 public subnet id에 아래와 같이 연결해준다.
resource "aws_iam_role" "demo" {
  name = "eks-cluster-demo"

  assume_role_policy = <<POLICY
{
  "Version": "2012-10-17",
  "Statement": [
    {
      "Effect": "Allow",
      "Principal": {
        "Service": "eks.amazonaws.com"
      },
      "Action": "sts:AssumeRole"
    }
  ]
}
POLICY
}

resource "aws_iam_role_policy_attachment" "demo_amazon_eks_cluster_policy" {
  policy_arn = "arn:aws:iam::aws:policy/AmazonEKSClusterPolicy"
  role       = aws_iam_role.demo.name
}

resource "aws_eks_cluster" "demo" {
  name     = var.cluster_name
  version  = var.k8s_version
  role_arn = aws_iam_role.demo.arn

  vpc_config {
    endpoint_private_access = false
    endpoint_public_access  = true

    subnet_ids = concat(aws_subnet.private[*].id, aws_subnet.public[*].id)
  }

  depends_on = [aws_iam_role_policy_attachment.demo_amazon_eks_cluster_policy]
}
07-nodes.tf
위와 마찬가지로 우선 AssumeRole 부분이 먼저 선언해주고,
resource "aws_iam_role" "nodes" {
  name = "eks-node-group-nodes"

  assume_role_policy = jsonencode({
    Statement = [{
      Action = "sts:AssumeRole"
      Effect = "Allow"
      Principal = {
        Service = "ec2.amazonaws.com"
      }
    }]
    Version = "2012-10-17"
  })
}
EKS의 Worker node에 필요한 IAM role 필수 3종 세트를 할당해준다.
resource "aws_iam_role_policy_attachment" "nodes_amazon_eks_worker_node_policy" {
  policy_arn = "arn:aws:iam::aws:policy/AmazonEKSWorkerNodePolicy"
  role       = aws_iam_role.nodes.name
}

resource "aws_iam_role_policy_attachment" "nodes_amazon_eks_cni_policy" {
  policy_arn = "arn:aws:iam::aws:policy/AmazonEKS_CNI_Policy"
  role       = aws_iam_role.nodes.name
}

resource "aws_iam_role_policy_attachment" "nodes_amazon_ec2_container_registry_read_only" {
  policy_arn = "arn:aws:iam::aws:policy/AmazonEC2ContainerRegistryReadOnly"
  role       = aws_iam_role.nodes.name
}
그리고 이제 실제로 worker node의 instance type과 개수를 지정해 생성해준다.
resource "aws_eks_node_group" "private_nodes" {
  cluster_name    = aws_eks_cluster.demo.name
  node_group_name = "private-nodes"
  node_role_arn   = aws_iam_role.nodes.arn

  # Distribute nodes across all private subnets for high availability
  subnet_ids = aws_subnet.private[*].id

  capacity_type  = "ON_DEMAND"
  instance_types = var.node_instance_types

  scaling_config {
    desired_size = var.node_desired_size
    max_size     = var.node_max_size
    min_size     = var.node_min_size
  }

  update_config {
    max_unavailable = 1
  }

  labels = {
    role = "general"
  }

  depends_on = [
    aws_iam_role_policy_attachment.nodes_amazon_eks_worker_node_policy,
    aws_iam_role_policy_attachment.nodes_amazon_eks_cni_policy,
    aws_iam_role_policy_attachment.nodes_amazon_ec2_container_registry_read_only,
  ]
}
08-iam-oidc.tf
EKS cluster의 OIDC issuer와 TLS 인증서를 가져와(첫째 블록), IAM OIDC provider를 생성한다(두번째 블록).
그러니깐 EKS가 자체 발급한 OIDC token을 AWS가 신뢰할 수 있게 하라는 뜻이다. → 그리고 이것을 worker-node 전체에 주는 대신, 각 pod별로 assume role하게 된다.
data "tls_certificate" "eks" {
  url = aws_eks_cluster.demo.identity[0].oidc[0].issuer
}

resource "aws_iam_openid_connect_provider" "eks" {
  client_id_list  = ["sts.amazonaws.com"]
  thumbprint_list = [data.tls_certificate.eks.certificates[0].sha1_fingerprint]
  url             = aws_eks_cluster.demo.identity[0].oidc[0].issuer
}
09-csi-driver-iam.tf
data "aws_iam_policy_document" "csi" {
  statement {
    actions = ["sts:AssumeRoleWithWebIdentity"]
    effect  = "Allow"

    condition {
      test     = "StringEquals"
      variable = "${replace(aws_iam_openid_connect_provider.eks.url, "https://", "")}:sub"
      values   = ["system:serviceaccount:kube-system:ebs-csi-controller-sa"]
    }

    principals {
      identifiers = [aws_iam_openid_connect_provider.eks.arn]
      type        = "Federated"
    }
  }
}

resource "aws_iam_role" "eks_ebs_csi_driver" {
  assume_role_policy = data.aws_iam_policy_document.csi.json
  name               = "eks-ebs-csi-driver"
}

resource "aws_iam_role_policy_attachment" "amazon_ebs_csi_driver" {
  role       = aws_iam_role.eks_ebs_csi_driver.name
  policy_arn = "arn:aws:iam::aws:policy/service-role/AmazonEBSCSIDriverPolicy"
}
10-csi-driver-addon.tf
현재와 추후에 필요한 AWS EKS의 add-on들을 설치해준다.
resource "aws_eks_addon" "kube_proxy" {
  cluster_name                = aws_eks_cluster.demo.name
  addon_name                  = "kube-proxy"
  resolve_conflicts_on_create = "OVERWRITE"
  resolve_conflicts_on_update = "OVERWRITE"

  depends_on = [aws_eks_node_group.private_nodes]
}

resource "aws_eks_addon" "vpc_cni" {
  cluster_name                = aws_eks_cluster.demo.name
  addon_name                  = "vpc-cni"
  resolve_conflicts_on_create = "OVERWRITE"
  resolve_conflicts_on_update = "OVERWRITE"

  depends_on = [aws_eks_node_group.private_nodes]
}

resource "aws_eks_addon" "coredns" {
  cluster_name                = aws_eks_cluster.demo.name
  addon_name                  = "coredns"
  resolve_conflicts_on_create = "OVERWRITE"
  resolve_conflicts_on_update = "OVERWRITE"
  configuration_values = jsonencode({
    computeType = "EC2"
  })

  depends_on = [
    aws_eks_node_group.private_nodes,
    aws_eks_addon.vpc_cni
  ]
}

resource "aws_eks_addon" "eks_pod_identity_agent" {
  cluster_name                = aws_eks_cluster.demo.name
  addon_name                  = "eks-pod-identity-agent"
  resolve_conflicts_on_create = "OVERWRITE"
  resolve_conflicts_on_update = "OVERWRITE"

  depends_on = [aws_eks_node_group.private_nodes]
}

resource "aws_eks_addon" "aws_ebs_csi_driver" {
  cluster_name                = aws_eks_cluster.demo.name
  addon_name                  = "aws-ebs-csi-driver"
  service_account_role_arn    = aws_iam_role.eks_ebs_csi_driver.arn
  resolve_conflicts_on_create = "OVERWRITE"
  resolve_conflicts_on_update = "OVERWRITE"

  depends_on = [
    aws_eks_node_group.private_nodes,
    aws_iam_role_policy_attachment.amazon_ebs_csi_driver
  ]
}