06. Master Node 추가 설치
다음은 4. VM 생성 및 네트워크 설정 (Master Worker 공통)에 이어서 Master Node 설치에만 적용되는 사항.
install kubeadm
Kubernetes 1.33 설치
Update the apt package index and install packages needed to use the Kubernetes apt repository:
sudo apt-get update -y
# apt-transport-https may be a dummy package; if so, you can skip that package
sudo apt-get install -y apt-transport-https ca-certificates curl gpg
# If the directory `/etc/apt/keyrings` does not exist, it should be created before the curl command, read the note below.
sudo mkdir -p -m 755 /etc/apt/keyrings
curl -fsSL https://pkgs.k8s.io/core:/stable:/v1.33/deb/Release.key | sudo gpg --dearmor -o /etc/apt/keyrings/kubernetes-apt-keyring.gpg# This overwrites any existing configuration in /etc/apt/sources.list.d/kubernetes.list
echo 'deb [signed-by=/etc/apt/keyrings/kubernetes-apt-keyring.gpg] https://pkgs.k8s.io/core:/stable:/v1.33/deb/ /' | sudo tee /etc/apt/sources.list.d/kubernetes.listsudo apt-get update -y
sudo apt-get install -y kubelet kubeadm kubectl
sudo apt-mark hold kubelet kubeadm kubectl(Optional) Enable the kubelet service before running kubeadm:
sudo systemctl enable --now kubeletkubeadm init
중요: master node에서만 실행!
sudo kubeadm init \
  --apiserver-advertise-address=10.10.10.11 \
  --pod-network-cidr=10.244.0.0/16
여러 메세지가 뜨는데
- preflight stage : checks to validate the system state before making changes
- certs stage :
[certs] Using certificateDir folder "/etc/kubernetes/pki"→ self-signed 인증서가 있다. etcd 폴더에는 etcd만의 인증서가 들어있다. - kubeconfig stage : API server와 연결하는 kubeconfig file들이 있다.
- kubelet-start stage : kubelet을 시작한다. 그러므로
service kubelet status를 치면 이제active (running)이라고 나온다. - control-plane stage :
/etc/kubernetes/manifests에 static pod의 manifest file을 이용하여 생성 - addons :
Applied essential addon: CoreDNS
Applied essential addon: kube-proxy
→ 이는 static pods가 아니고 addon이다.
마지막 메세지는
Your Kubernetes control-plane has initialized successfully

To start using your cluster, you need to run the following as a regular user

  mkdir -p $HOME/.kube
  sudo cp -i /etc/kubernetes/admin.conf $HOME/.kube/config
  sudo chown $(id -u):$(id -g) $HOME/.kube/config

Alternatively, if you are the root user, you can run:

  export KUBECONFIG=/etc/kubernetes/admin.conf

You should now deploy a pod network to the cluster.
Run "kubectl apply -f [podnetwork].yaml" with one of the options listed at
  https://kubernetes.io/docs/concepts/cluster-administration/addons/

Then you can join any number of worker nodes by running the following on each as root:

kubeadm join 10.10.10.11:6443 --token 12xgms.mw6legd1toal8f35 \
        --discovery-token-ca-cert-hash sha256:2213e705350f94abe9b47ee4a1f29d8e59c19f37833fe17bd8f302297f7629bd
export KUBECONFIG=/etc/kubernetes/admin.conf해도 되지만
export 명령어는 그 세션에만 적용되니 의미가 없다. 그러므로 아래를 따름
mkdir -p $HOME/.kube
sudo cp -i /etc/kubernetes/admin.conf $HOME/.kube/config
sudo chown $(id -u):$(id -g) $HOME/.kube/config
실행 결과:
root@k8s-master-node-ive:/svc# kubectl get node
E0520 08:04:12.712003   11279 memcache.go:265] "Unhandled Error" err="couldn't get current server API group list: Get \"http://localhost:8080/api?timeout=32s\": dial tcp 127.0.0.1:8080: connect: connection refused"
root@k8s-master-node-ive:/svc# export KUBECONFIG=/etc/kubernetes/admin.conf
root@k8s-master-node-ive:/svc# kubectl get node
NAME                  STATUS     ROLES           AGE   VERSION
k8s-master-node-ive   NotReady   control-plane   28m   v1.33.1
6443 포트가 열렸는지 확인
nc -vz 127.0.0.1 6443
Connection to 127.0.0.1 6443 port [tcp/*] succeeded!
이제 master node에서
kubectl get node을 실행하면 보인다.
alias 설정
더 진행하기 전에 매번 kubectl 명령어를 적기 귀찮으니 이를 k만 적어도 되게 alias를 설정하자.
nano ~/.bashrc다음 추가
# kubectl alias
alias k='kubectl'
적용
source ~/.bashrc여기까지 현재 node는 NotReady이고 coredns는 Pending 이라고 나온다.
root@k8s-master-node-ive:/home/tech# k get node
NAME                  STATUS     ROLES           AGE     VERSION
k8s-master-node-ive   NotReady   control-plane   3h51m   v1.33.1
root@k8s-master-node-ive:/home/tech# k get pod -n kube-system
NAME                                          READY   STATUS    RESTARTS   AGE
coredns-674b8bbfcf-95mhr                      0/1     Pending   0          3h51m
coredns-674b8bbfcf-x4rfj                      0/1     Pending   0          3h51m
이것을 해결하기 위해 다음 pod networking을 설치해야한다. 우리는 Calico를 설치할 것이다.
Calico 설치
공식문서: https://kubernetes.io/docs/concepts/cluster-administration/addons/
를 보면 다양한 Network plugin을 볼 수 있다.
다시 강조하지만 Master VM에만 설치!!
공식문서 참조: https://docs.tigera.io/calico/latest/getting-started/kubernetes/self-managed-onprem/onpremises
kubectl apply -f https://docs.projectcalico.org/manifests/calico.yaml위 명령어는 kubeadm init에서 설정했던 10.244.0.0/16을 읽어온다.
Calico 버전 확인 :
> kubectl get daemonset calico-node -n kube-system \
  -o jsonpath='{.spec.template.spec.containers[?(@.name=="calico-node")].image}'
docker.io/calico/node:v3.25.0
이제
k get all -n kube-system하면 core-dns와 calico가 올라온 것을 확인할 수 있다.
확인 차 coredns를 한 번 restart 시켜줘도 된다. (/etc/resolve.conf를 제대로 읽게)
kubectl -n kube-system rollout restart deployment corednsk get pod -n kube-system -o wide하면 새로 생긴 pod의 IP는 10.244.x.x를 부여받은 것을 확인할 수 있다.
(선택) 만약에 kubeadm init할 때 나왔던 join을 적어놓지 않았다면 새로 생성할 수 있다.
kubeadm token create --print-join-commandInstall metrics server
네트워크 설정
확인
k top node아직 안 된다
클라우드는 다음 한 명령어로 설치가 되는데 여기서는 안 된다.
kubectl apply -f https://github.com/kubernetes-sigs/metrics-server/releases/latest/download/components.yaml> kubectl get nodes -o wide
NAME STATUS ROLES AGE VERSION INTERNAL-IP EXTERNAL-IP OS-IMAGE KERNEL-VERSION CONTAINER-RUNTIME
k8s-master-node-ive Ready control-plane 23h v1.33.1 192.168.122.68 <none> Ubuntu 22.04.5 LTS 5.15.0-140-generic containerd://2.1.0
k8s-worker-2-aespa Ready worker 71m v1.33.1 192.168.122.78 <none> Ubuntu 22.04.5 LTS 5.15.0-140-generic containerd://2.1.0이유는 디폴트로 해당 node의 kubelet이 자신의 주 인터페이스(DHCP로 할당된 NAT)를 Internal IP로 등록했기 때문에, Metrics Server가 정확히 그 주소를 사용해서 통계를 수집하려고 하는데, Calico 내부에서는 그곳으로 라우팅할 수 없기 때문이다.
이는 앞의 글(이론)에서 살펴보았듯이 NAT 대신 실제 클러스터 네트워크에서 접근 가능한 IP를 사용하도록 kubelet을 구성해야 하기 때문이다.
→ 각 node의 Kubelet 에게 VXLAN 주소 (10.10.10.x) 를 node 내부IP로 쓰게 해줘야한다.
Then Metrics Server will connect to 10.10.10.12:10250, which is routable.
IP=$(ip -4 addr show enp7s0 | awk '/inet /{print $2}' | cut -d/ -f1)
echo ${IP}
sudo tee /etc/default/kubelet <<EOF
KUBELET_EXTRA_ARGS="--node-ip=${IP}"
EOFsudo systemctl daemon-reload
sudo systemctl restart kubelet확인: Master node에서
> k get node -o wide
> ps aux | grep '[k]ubelet'
확인하면
k get node -o wide
NAME                  STATUS   ROLES           AGE   VERSION   INTERNAL-IP   EXTERNAL-IP   OS-IMAGE             KERNEL-VERSION       CONTAINER-RUNTIME
k8s-master-node-ive   Ready    control-plane   23h   v1.33.1   10.10.10.11   <none>        Ubuntu 22.04.5 LTS   5.15.0-140-generic   containerd://2.1.0
k8s-worker-2-aespa    Ready    worker          89m   v1.33.1   10.10.10.12   <none>        Ubuntu 22.04.5 LTS   5.15.0-140-generic   containerd://2.1.0
node IP가 private IP로 바뀌어있는 것을 확인
Metrics 설치
이제 다음 명령어로 Master node에서만 metrics 설치
metrics를 다운로드 받는다.
metrics pod가 생성이 안 되는데 이는 mTLS 때문이다. metrics server는 metrics만 필요하므로 patch를 통해 mTLS를 metrics에서만 해제시키기 위해 다운로드받아서 수정하기 위함.
curl -fsSL -o metrics-server.yaml \
  https://github.com/kubernetes-sigs/metrics-server/releases/latest/download/components.yaml

vim metrics-server.yaml
kind: Deployment에 있는 아래 코드 수정
    spec:
      hostNetwork: true
      containers:
      - args:
        - --cert-dir=/tmp
        - --secure-port=4443
        - --kubelet-preferred-address-types=InternalIP,Hostname
        - --kubelet-insecure-tls
        - --kubelet-use-node-status-port
        - --metric-resolution=15s
        image: registry.k8s.io/metrics-server/metrics-server:v0.7.2
        imagePullPolicy: IfNotPresent
        livenessProbe:
          failureThreshold: 3
          httpGet:
            path: /livez
            port: https
            scheme: HTTPS
          periodSeconds: 10
        name: metrics-server
        ports:
        - containerPort: 4443
즉, 아래만 수정
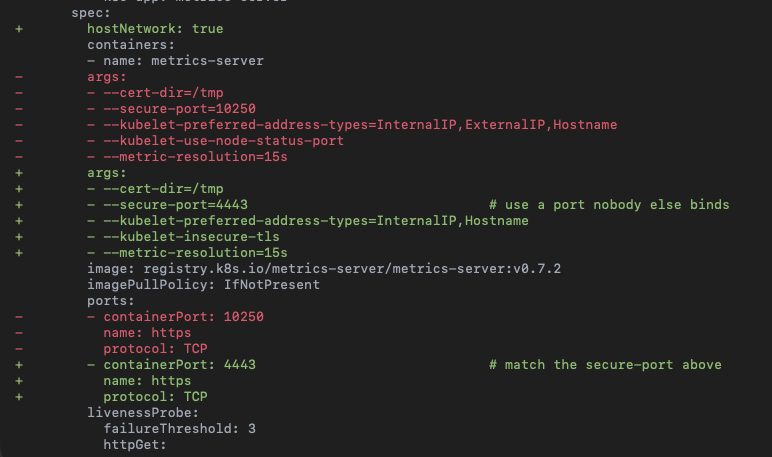
적용:
kubectl apply -f metrics-server.yaml이제 확인
k get all -n kube-system
k top nodes
k top pods --all-namespaces
이로서 Master node 설정은 다 되었고 이제 Worker Node를 생성하기 위해서는 04. VM 생성 및 네트워크 설정 (Master Worker 공통)대로 따라하고 그 다음에 07번 글로 넘어가면 된다.